


By the end of this lesson, you will:
1. Understand the fundamental
elements of vector graphics.
2. Gain knowledge about paths,
strokes, and fills in vector design.
3. Be introduced to shapes and
points as essential components.
4. Learn how to manipulate basic elements to create intricate designs.
1. Understanding Paths, Strokes,
and Fills:
1.1 Paths:
Paths are the backbone of vector
graphics. They represent the outlines or trajectories of shapes. Understanding
how to create, edit, and manipulate paths is crucial for vector design.
A path consists of segments and vertices. Segments are the lines or curves that connect vertices. Vertices define where each segment of a path starts and ends. Some Adobe applications use the terms anchor point and path point to refer to a vertex.
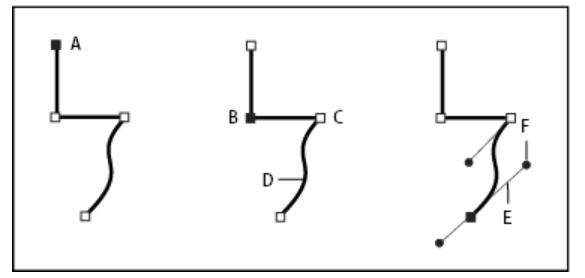 |
| Components of path |
 |
| Points of path |
 |
| Adjusting the direction lines on a smooth point (left) and a corner point (right) |
1.2 Strokes:
Strokes define the outline of a shape or path. You will explore how to control stroke properties such as thickness, style, and color to enhance the visual appeal of your designs.


1.3 Fills:
Fills refer to the interior of a shape or path. Discover how to apply different fill patterns, gradients, and colors to add depth and texture to your vector creations.
Fill Examples: (stroke = none)

Shapes and points are the
building blocks of vector graphics, which are images created using mathematical
formulas rather than pixels. This allows them to be scaled without loss of
quality. Here’s a basic introduction to these concepts:
- Shapes: In vector graphics, shapes are created by connecting paths. These can be simple shapes like rectangles and circles or more complex ones created using the Pen tool in graphic software. Shapes are defined by their boundaries and can be filled with colors or patterns.
- Points: Points, or anchor points, are specific
locations on a path that determines the shape’s structure. There are two
main types of points:
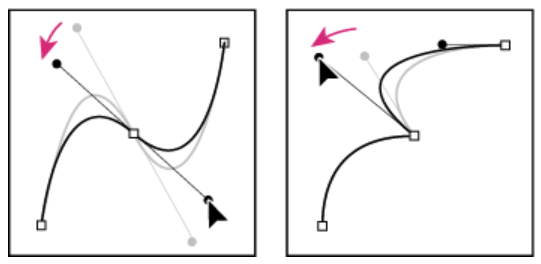
- Corner Points: These points create a sharp angle and are used to define straight lines.
- Smooth Points: These points have handles that control the curvature of the path, allowing for the creation of smooth, curved lines.
To manipulate basic elements in
vector graphics, you can use various tools and techniques provided by vector
graphics software. Here are some fundamental ways to manipulate vector objects:
· Resize: Adjusting the size of an object without
altering its proportions. This is essential when scaling your design
to fit different formats or sizes.

· Crop: Removing unwanted parts of an object or
image. This helps to focus on the most important elements of your design.

· Warp: Distorting or transforming an object to
create a new shape. This can add dynamic effects or adjust the perspective of
your design.

· Rotate: Turning an object around a central
point. This is useful for creating patterns or adjusting the orientation of
elements in your design.

· Skew: Slanting an object along the X or Y
axis. This can create a sense of motion or depth.

These tools allow you to fine-tune
your vector artwork, object-by-object, to achieve the desired image
transformation effects1. Additionally, you can manipulate the
individual points and paths to reshape the objects to your liking.
In summary of this lesson, a solid grasp of these fundamental elements lays the groundwork for creating visually appealing and scalable vector designs, providing a dynamic platform for artistic expression.
Sources:
1. Overview of shape layers, paths, and vector graphics (adobe.com)
2. Intro to vector graphics. Paths and anchor points. (juliannakunstler.com)
3. Manipulating Vector Objects | CorelDRAW
4. The Anatomy of a Vector Illustration - Part Three Continued (sketchpad.net)

0 Comments